How can I improve the quality of my design file?
If you want to improve the quality of a JPG/PNG format file, you have the following three options:
- Try vectorizing the file. Once it's vectorized, you can save it again as a high-resolution raster file without losing any pixels.
- Reduce the image size. This will increase the resolution, but a visually shrunk design may not be what you want.
- Recreate the design at a higher resolution(150DPI or above is recommended).
Can I use files with gradients or semi-transparency?
Yes. Our newly improved DTG printing technology can achieve both gradients and semi-transparency.
What should I do if I see a “Low resolution” alert?
There are two solutions if you see a "Low resolution" alert.
- Submit a new file at a minimum resolution of 75 DPI (150 DPI or above is recommended).
- Reduce the image size in our Design Creator until the "Low resolution" alert is removed. However, the design may not look the way you want after resizing.
How do I add text to a product?
To start, you must first choose a product, open our Design Creator, and select a print area where you want to add text. There are two ways to add text to a product.
One way is to click the "Add Text" button above the Design Creator palette and enter your text directly in the textbox. You can freely adjust the text size and style in the tool palette.
Another way is to use design software(Photoshop, Illustrator, etc.) to design your text and save the file in PNG or JPG format. Then press "Add image" in PODpartner's Design Creator, upload the file you just saved, and adjust the image size and position the way you want.
How many print areas does Design Creator support?
Our Design Creator supports a maximum of 18 print areas on a garment. You can add up to 7 designs on the front/back side.
Can I edit a design I previously created?
Yes. You can go to Dashboard, click on "Product Templates", find the template you want to modify, click the "Edit" button to access the Design Creator, and start editing the template.
Please note that if the template has already been applied in an unpaid order, you cannot directly edit it. However, you can duplicate it and edit the copy.
How will my design look in different garment sizes?
Your design will look the same no matter the garment size, because the actual print size always remains proportional to the garment size.
Do I need to follow any content rules?
We encourage creativity and personality on the premise of originality and respect for the law. Please keep in mind that you are solely responsible for the content in the print and embroidery files you upload. Any print and embroidery pertaining to the following content violations may be reviewed or removed permanently.
1. Intellectual property infringement
Intellectual property infringement mainly consists of trademark/patent/copyright infringement and violation of publicity rights. The content you submit to PODpartner must be original and comply with intellectual property law.
2. Illegal content
Content containing images or depictions of child abuse, child pornography, or any form of obscenity is not tolerated; content that promotes crime, violence, terrorism, or other harmful activities is also prohibited.
3. Hateful content
We do not allow any content expressing hatred towards or threatening other people based on their race, age, gender, gender identity, ethnicity, national origin, sexual orientation, religion, disability, or serious disease.
4. Infringement of privacy
You may not submit any content that contains another person’s sensitive personal information, including but not limited to their name, picture, confidential scripts, or depiction of their private affairs unless you have their consent.
What is Custom Layer?
A custom layer is a customized design element that your customers can add to a garment. You can turn any image or text layer into a custom layer that your customers can personalize right in your store (such as adding names to neck tags or including a personal slogan alongside your brand design). All custom elements automatically flow through to PODpartner with each order. You just handle payment and we take care of the rest.
Note: This feature is currently available for Shopify stores only. We're working on expanding to other platforms.
Key points:
- Each product can have up to 3 custom layers.
- Custom layers apply only to DTG (direct-to-garment) printing, not embroidery. But custom layers can coexist with embroidery designs.
- Custom layers are optional; customers can choose to keep the default design or add their own.
- Once set by you in our Design Creator, customers cannot change font styles, font colors, sizes, or positions of the custom layers.
If a product template contains a custom layer, its thumbnail preview will be distinguishable from regular product templates by showing a customization symbol on the top right.
 If a product template containing custom layers is converted to an order, its order status on the Order page will be “Customization”.
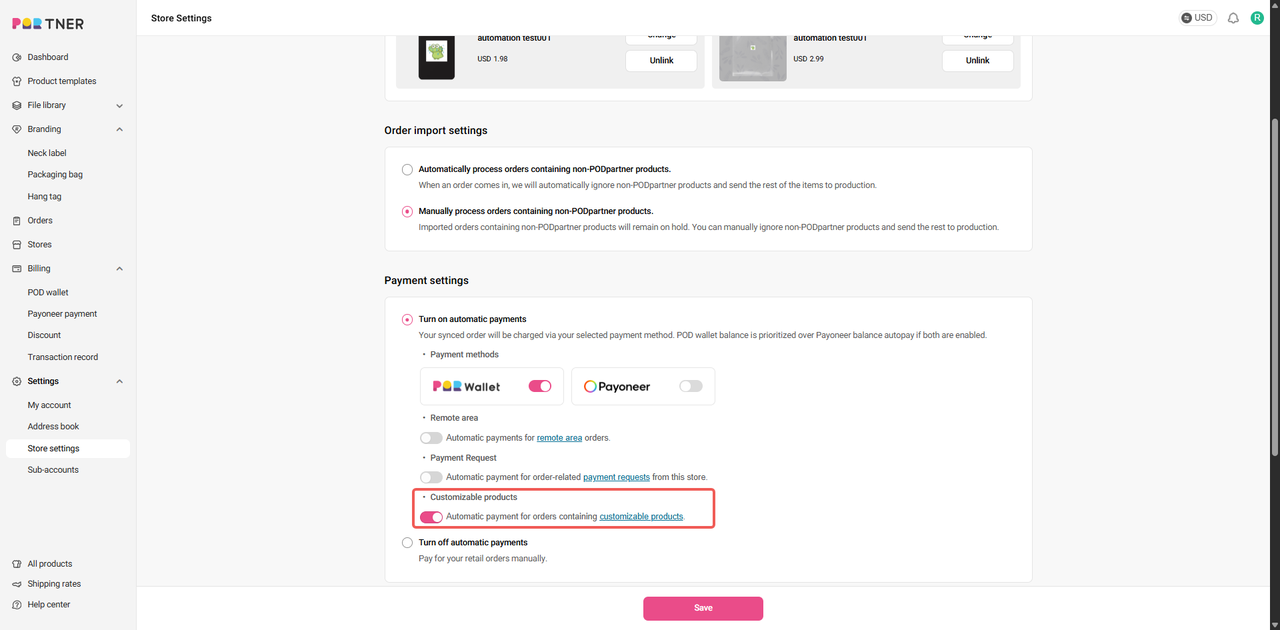
You can set up automatic payments for customizable products to process orders more efficiently. To do this, go to PODpartner Dashboard > Settings >Store settings, find the Payment settings section for your Shopify store, then turn on automatic payments and toggle the Customizable product option.
If you need to edit a custom layer, you should do it before paying for the order. In case of any issues occurring after the payment, please reach out to our customer service.
To learn how to create a custom layer, please check out our detailed tutorial.
How do I manage my print files?
You can view and manage all your print files in File Library.
Upload files
You can click the “Upload" button to upload a single file or batch files. Once uploaded, these files will appear in the "My Files” section.
Manage files
If you mouse over an uploaded file, you will see a checkbox appears in the top left corner of the image. Choose a file by ticking the box, then you can move it to another folder, download it to your computer, or delete it. You can also rename the file by clicking on the original name under the image.
Create a new folder
On the “File Library” page, click the "New Folder" button to create a new folder. The new folder can be found in the "My Folder" section.
Manage folders
When you hover your cursor over a folder, two small icons will pop up in the top right corner, meaning you can either rename the folder or delete it.
Upload files to a particular folder
Open a folder, click on “Upload", and add files to this folder.

 USD
USD