
 USD
USD
How to Add Navigation on an Online Store in Shopify

Navigation is the backbone of how customers move through your store. It determines whether visitors immediately understand what you sell, how quickly they can reach products, and how confident they feel clicking deeper instead of leaving. Even the best-designed product pages won’t convert if customers struggle to get to them.
In Shopify, navigation is managed centrally from the Shopify admin and then displayed through your active theme. This separation gives store owners flexibility, but it also creates confusion for beginners who assume menus “just show up” automatically.
This guide explains how to add, manage, and troubleshoot navigation in Shopify using a clear, step-by-step approach based on Shopify’s current admin layout. Along the way, you’ll learn why menus sometimes don’t appear, how themes affect navigation behavior, and how to structure menus in a way that supports conversions instead of slowing customers down.
Understanding How Shopify Navigation Works
Before changing any settings, it’s important to understand how Shopify handles navigation behind the scenes.
All navigation menus in Shopify now live under Content → Menus in the Shopify admin. This section acts as the central control panel where menus are created, edited, and stored. These menus exist independently of your theme, which means switching themes won’t delete them—but it will affect where and how they appear.
Menus do not display automatically. Creating or editing a menu does not guarantee customers can see it. Your theme must be explicitly told which menu to display and where. This is one of the most common reasons store owners think their navigation is broken.
Most Shopify stores rely on two core menu types:
- Main menu, usually displayed in the header
- Footer menu, shown at the bottom of the store
Some themes support additional menus such as secondary headers, mega menus, or mobile-only menus, but the main and footer menus are universal across Shopify.
Themes also control how menus behave. Dropdowns, slide-out mobile menus, collapsible sections, and icon-based navigation are all theme-dependent. This is why the same menu can look completely different across two themes.
For example, a store selling custom apparel through a print-on-demand partner like PODpartner often places collections such as T-Shirts, Hoodies, and Embroidered Items directly in the main menu. Apparel shoppers expect fast access to categories, and reducing clicks directly improves engagement and conversion.
Understanding this separation—menus live in Content → Menus, visibility lives in the theme editor—prevents most beginner mistakes before they happen.
Steps to Create and Manage Navigation Menus
This section covers the first three steps of the process. These steps are critical because mistakes here affect the entire store experience.
Step 1: Access the Menus Section in Shopify
Start by logging into your Shopify admin. From there:
- Click Content
- Select Menus
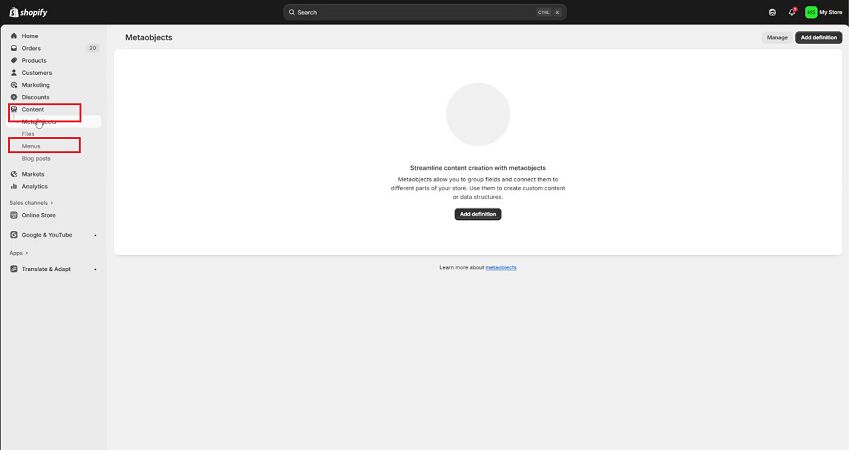
You’ll see a list of existing menus. Most stores start with a default Main menu and Footer menu, which Shopify creates automatically during setup.
This is your navigation foundation. Every link customers click in your header or footer originates here.
Step 2: Create a New Menu or Edit an Existing One
From the Menus screen, you can either select an existing menu or click Add menu to create a new one.
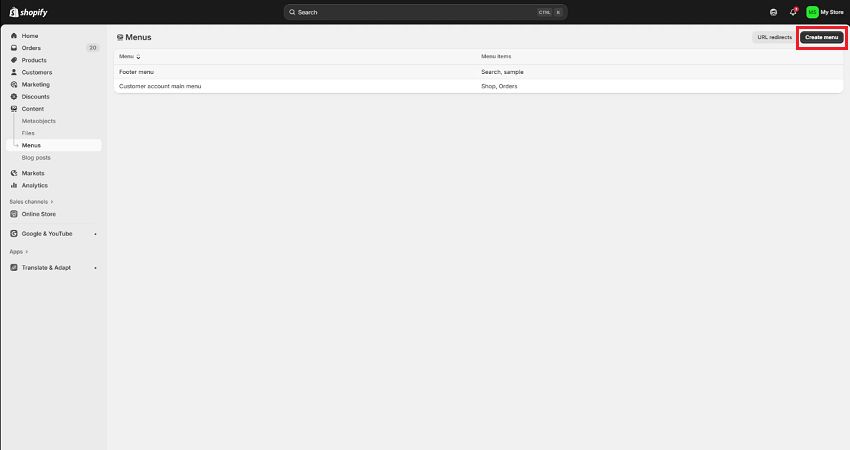
The menu name is for internal use only—customers never see it. Choose names that make sense to you and your team, especially as your store grows and you manage multiple menus.
For most beginners, it’s best to start by editing the Main menu instead of creating multiple menus too early. Unnecessary complexity often leads to confusion and layout issues later.
Step 3: Add Menu Items the Right Way
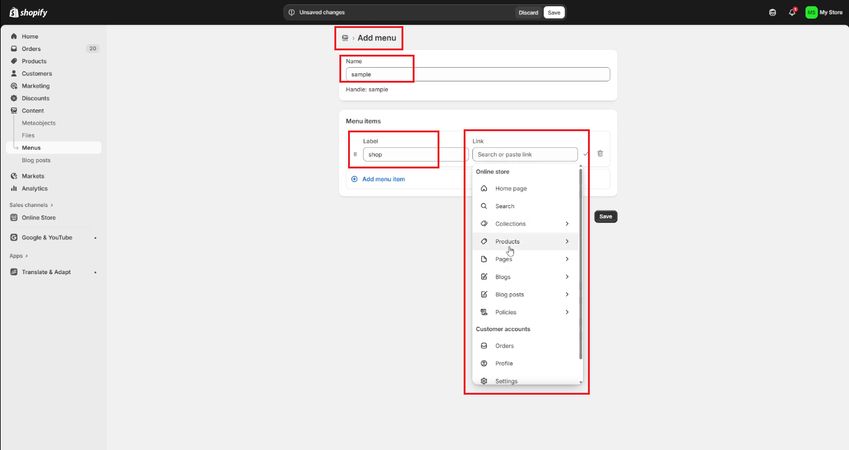
Inside the menu, click Add menu item. Shopify allows you to link menu items to:
- Collections
- Pages
- Products
- Blog posts
- External URLs
- Apps (such as order tracking or helpdesk tools)
This is where many stores quietly lose conversions.
Menu labels should match how customers think, not how your backend is organized. Labels like Shop, Collections, or All Products are intuitive. Internal terms like Catalog, SKU Index, or Inventory create friction.
Best practices to follow:
- Link collections instead of individual products so your navigation scales as you add items
- Avoid linking to unpublished pages—broken links kill trust
- Keep labels short, readable, and mobile-friendly
Navigation is a promise. Every link sets an expectation about what customers will see next. If that promise isn’t clear, customers hesitate.
Organizing Menu Structure and Dropdowns
Once your menu items exist, structure determines whether navigation feels effortless or overwhelming.
Step 4: Organize Menu Order and Dropdowns
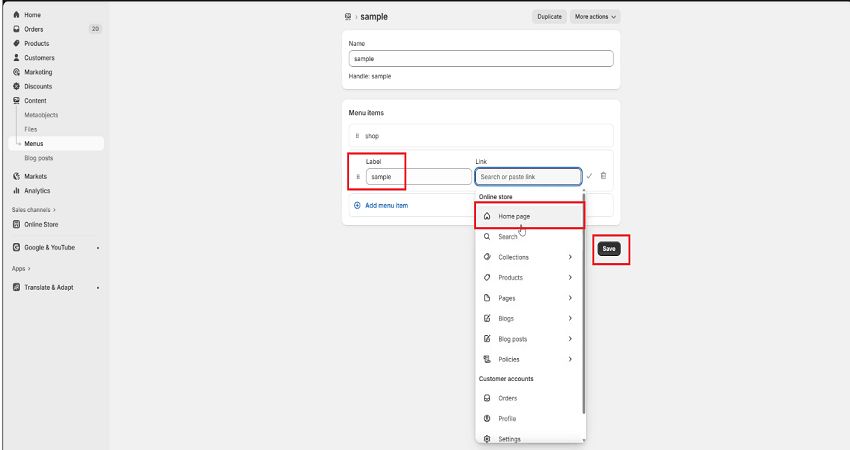
Shopify lets you reorder menu items using drag-and-drop. This order matters more than most store owners realize.
The first few links in your menu receive the majority of clicks. Place your most important collections or pages at the top. Less critical links can appear lower or inside dropdowns.
Dropdown menus are created by nesting items under a parent link. This works well for grouping related categories—for example, placing T-Shirts, Hoodies, and Accessories under a single Shop menu.
However, restraint is important. Deep dropdowns are difficult to use on mobile, where most Shopify traffic comes from.
Effective dropdown guidelines:
- One level deep works best
- Group logically, not excessively
- Avoid forcing customers to “hunt” through menus
Navigation should reflect how customers mentally categorize products—not how items are stored internally.
When done well, navigation reduces bounce rates, increases session duration, and improves product discovery without changing ads or pricing.
Displaying Navigation in Your Shopify Theme
This final step is also the source of most “why isn’t my menu showing?” complaints.
Step 5: Assign Menus in the Theme Editor
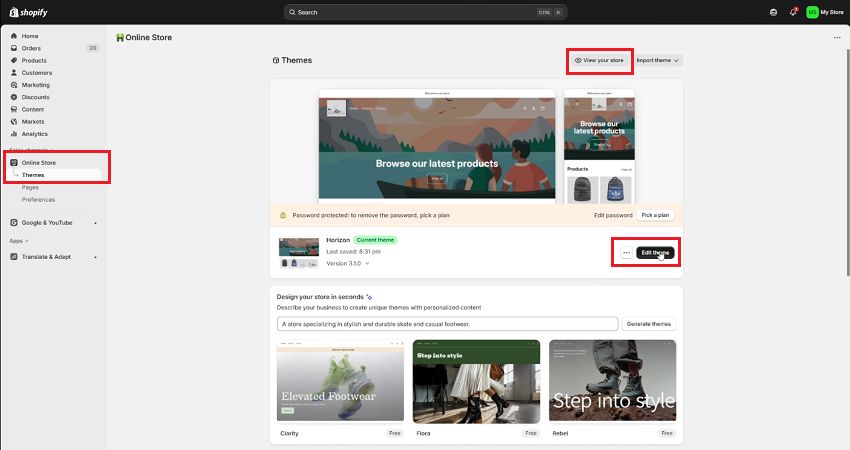
To make your menus visible on the storefront:
- Go to Online Store → Themes
- Click Customize on your active theme
- Open the Header or Footer section
- Select the correct menu from the menu dropdown
- Save your changes
After assigning the menu, preview your store on both desktop and mobile. Mobile navigation often uses slide-out menus or icons and may behave differently from desktop layouts.
Before publishing, click every menu link to confirm that pages and collections are live and loading correctly.
Common Navigation Issues and How to Fix Them
If navigation doesn’t appear or behaves unexpectedly, the issue is usually one of the following:
- The menu exists but hasn’t been assigned in the theme
- The linked page or collection is unpublished
- A theme change removed menu assignments
- Mobile navigation uses a different layout or menu setting
Menus don’t break when themes change—they simply need to be reassigned. This catches many store owners off guard.
Most navigation issues are theme-related, not menu-related.
Conclusion
Adding navigation to a Shopify store follows a simple process: create menus, add meaningful links, organize them thoughtfully, and assign them to your theme. The mechanics are straightforward, but the impact is significant.
Clear navigation improves usability, builds trust, and helps customers move confidently through your store. As your catalog grows and your business evolves, your navigation should evolve with it.
The best Shopify stores don’t just look good—they feel easy to use. When customers don’t have to think about where to click, they’re far more likely to stay, explore, and buy.
Further reading

No Order Minimums

No Membership Fees

No Unsold Stock

No Quality Concerns
Only Creativity, Satisfaction, and Profits!