What should I do if I’m not satisfied with the digitized design?
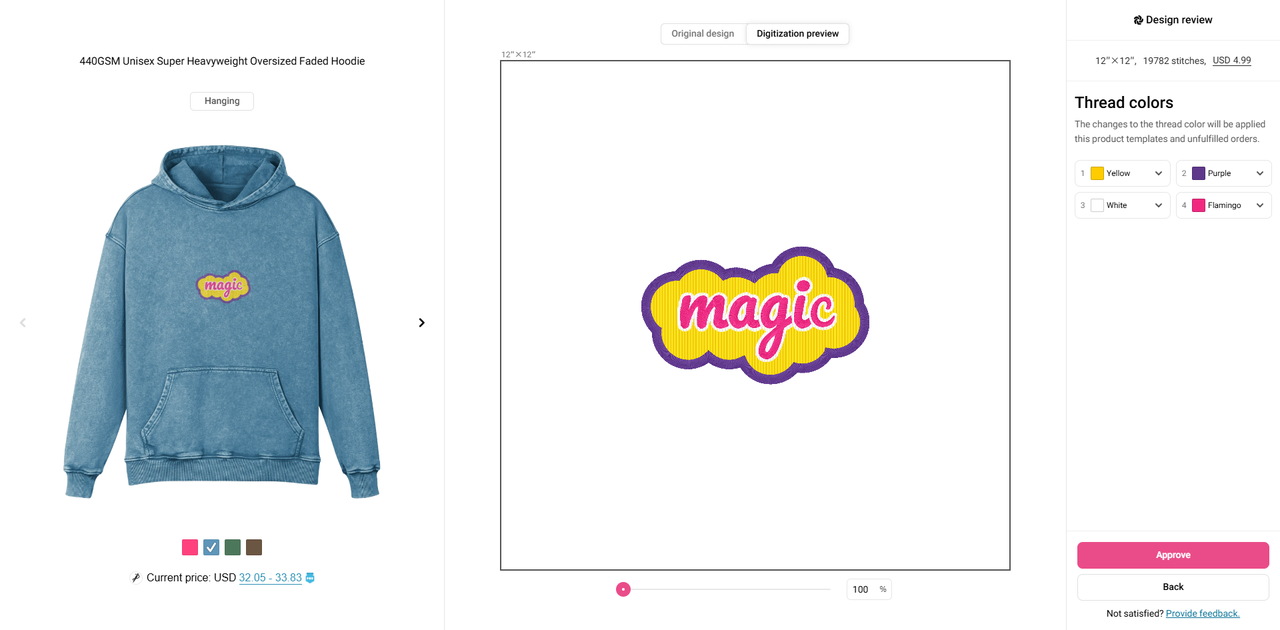
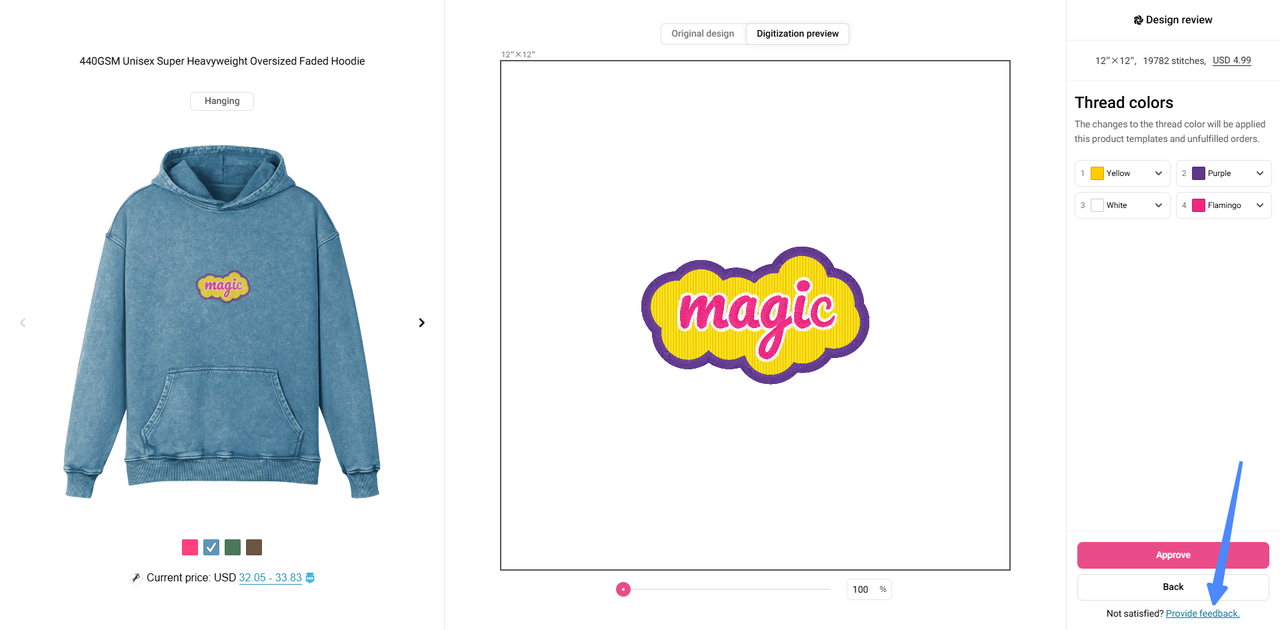
We provide two free revision opportunities during the digitization process. In the Design review interface, you can click Provide feedback and describe the changes you need in the text box. You can ask for a refund if you are still unsatisfied after these revisions.
When/How should I review the digitization previews?
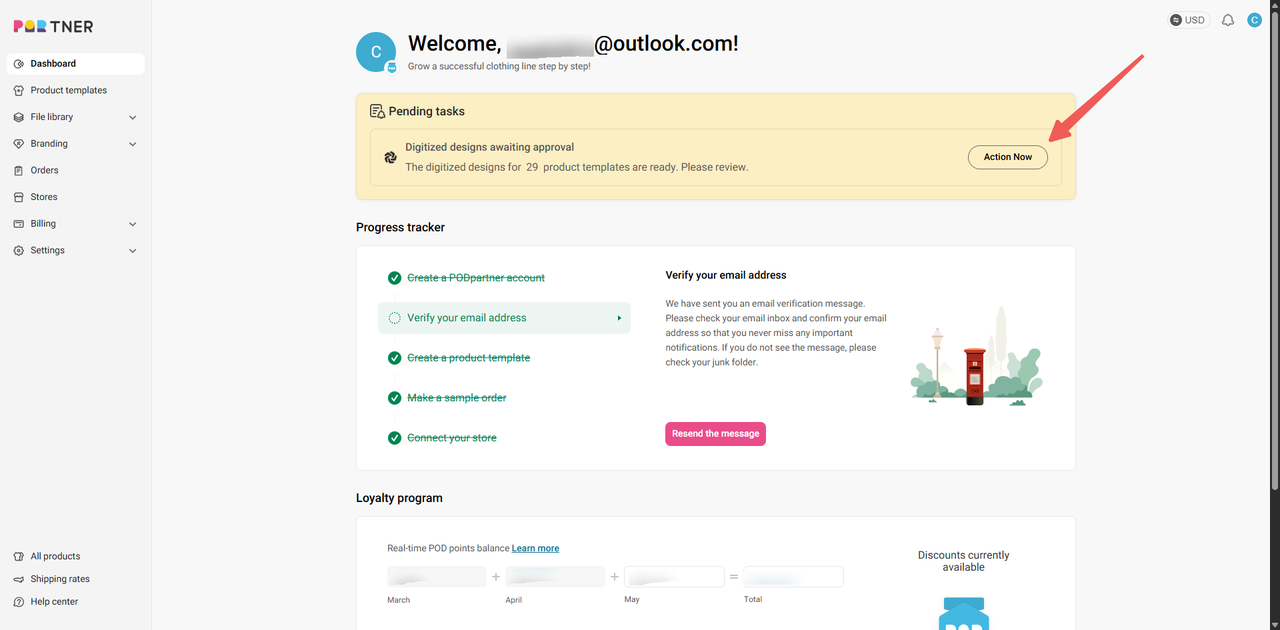
Once digitization is complete, you will receive a notification on your dashboard prompting you to review the digitization previews.
Alternative method:
You can also find the relevant template through Dashboard > Product Templates. Templates with the "Awaiting Approval" label are the ones you need to review and approve.
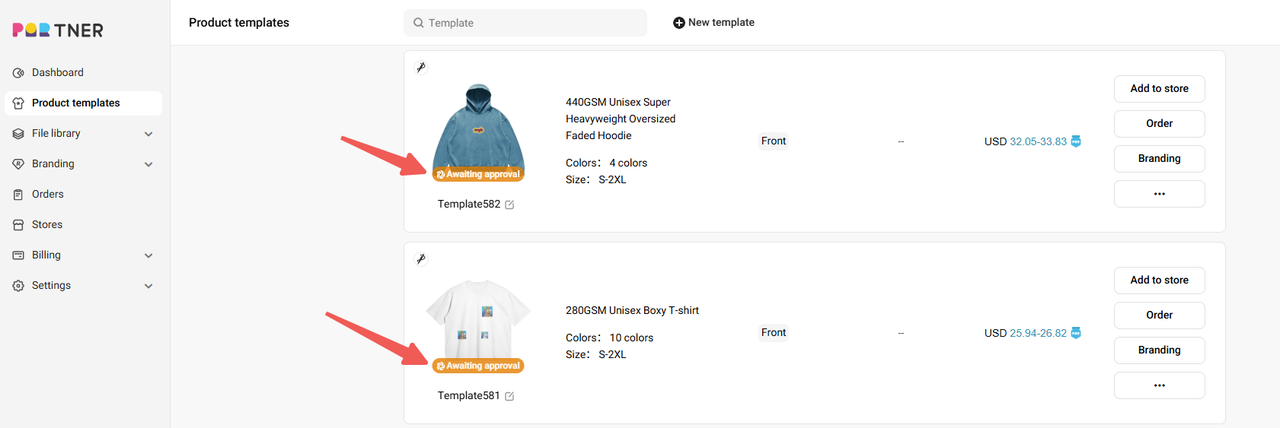
Click on the template to go to the template details page. Scroll down to the File Digitization section and click "Review". On the new page, click the "Review Design" button.
In the Design review interface, carefully check if the digitization preview meets your expectations. If everything looks good, click Approval. If there are issues, click Provide feedback to request changes.
Note: We appreciate your prompt review, as it will help us maintain your desired production schedule. Any delay in the review may impact production and delivery timelines.
How long does embroidery digitization take?
Digitization typically takes 1–2 business days to complete. If you request any revisions after receiving the digitization previews, each round of revisions will also require 1–2 business days.
When does the digitization process start?
When your product template contains designs that require digitization, the digitization process will start after you pay for your first order of that product template.
What happens if my embroidery design falls outside of the guidelines?
During the digitization process, if we find that your design does not meet our guidelines, our team will notify you and provide specific feedback. Once you receive the embroidery preview, you can choose to either modify your design to comply with our standards or cancel the order and request a refund. We’ll work closely with you to ensure your design can be embroidered successfully while maintaining quality.
Please make sure to understand our design guidelines beforehand to help avoid unnecessary back-and-forth, delays, and inefficiencies.
How many images can be added to one embroidery frame?
You can add up to 5 images within a single embroidery frame. Please note:
- Each image must fit within the maximum frame dimensions. (We offer three frame sizes to choose from: 3" x 4", 3" x 12", and 12" x 12".)
- Combined designs should maintain proper spacing.
How accurate are embroidery mockups?
Embroidery mockups provide a visual preview generated automatically from your uploaded image before the digitization process. They are intended as a reference to give you a general idea of the final look, but they cannot guarantee an exact match in every detail.
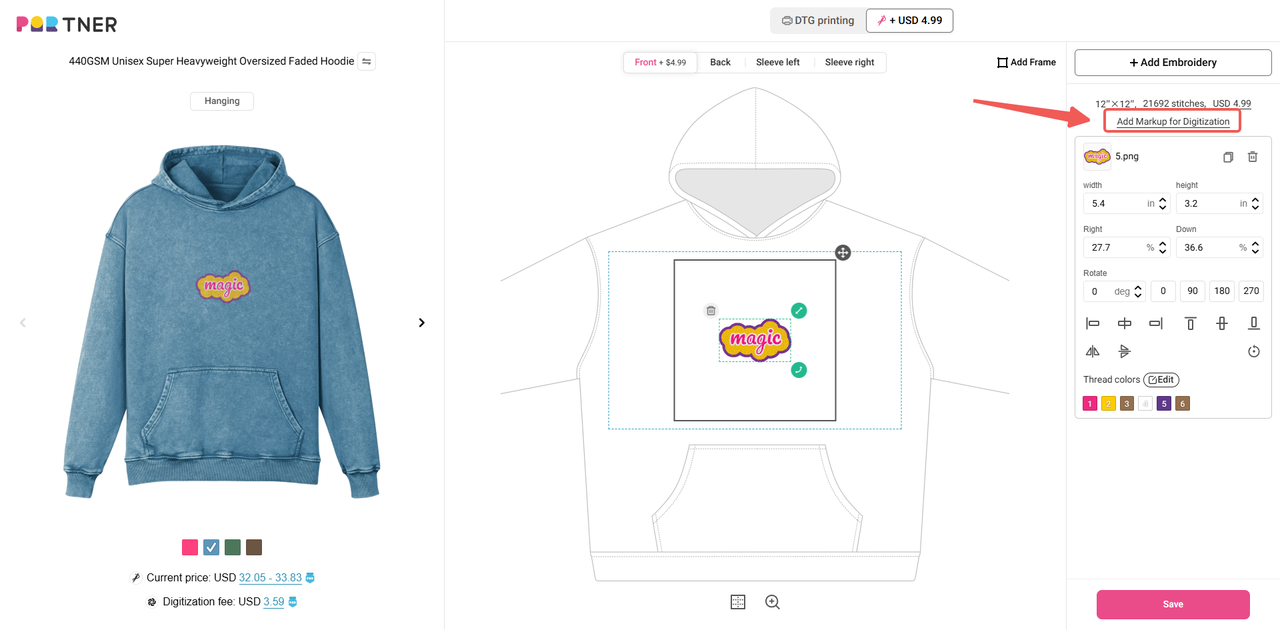
When you see the mockup, you can decide if any design adjustments are needed or opt for our “Add Markup for Digitization” feature. During digitization, our expert digitizers will refine and optimize the artwork based on your markups to ensure the best possible embroidery quality.
The digitization preview you receive afterward will be a more accurate representation than the initial mockup. However, we strongly recommend ordering a sample to verify the design’s appearance and quality on the actual garment before adding it to your store.
What are the processes of digitization?
The digitization process ensures your custom design (image format) is transformed into a high-quality embroidery file.
Before you begin the digitization process, make sure you know how to create designs that are best suited for conversion into embroidery files. To help you with this, please read our embroidery design guide.
Here are the key steps of how embroidery digitization works at PODpartner:
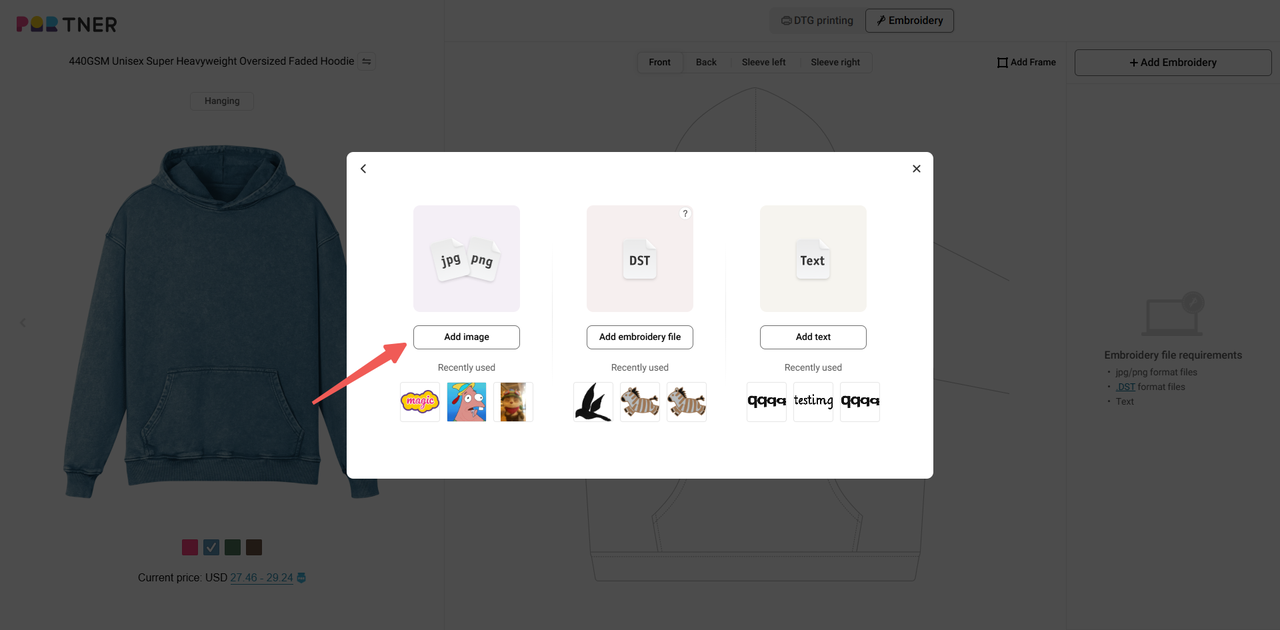
1.Customize your design: Start by selecting the garment you want to embroider. From the top bar in the Design Creator, choose Embroidery and select the area where the design will be placed. Click on "Add Embroidery," select an embroidery frame, and then upload your image. Note that only designs uploaded via the "Add Image" option require digitization.
You can adjust the position, size, and thread color of the embroidery design on the garment. Additionally, if you have any special requests for the embroidery file, such as adding outlines to specific parts of the design, you can indicate your requirements using the "Add Markup for Digitization" feature.
2.Pay the digitization fee: A one-time digitization fee is charged for each product template, applicable only upon the first payment for that template.
3.Design enters the digitization process: Once the fee is paid, our expert digitizers will create a high-quality embroidery file based on your design and specific requirements. This process takes 1-2 business days to complete, ensuring that your design is ready for precise embroidery on the garment.
4.Preview and approve: After digitization, you will receive a preview of the digitized file for your approval. Please keep an eye on the pending tasks notification on your dashboard, and review each design carefully.
If you’re not completely satisfied, you can mark or describe your revision requests in the "Provide feedback" section at the bottom right of the design review screen. We want to ensure your vision comes to life exactly as you imagined. Please note that if you request rework on the embroidery file, it will also take 1-2 business days to complete.
5.Sit back and relax: Production starts once you've approved the digitized design. Keep in mind that the time taken for digitization may affect your overall timeline, including production and shipping. Compensation for delays will be calculated from the date you approve the digitized design.
What is embroidery digitization?
Embroidery digitization is the process of converting artwork into a format that embroidery machines can read and stitch. Unlike regular image files, digitized designs contain specific instructions for the embroidery machine, including stitch types, directions, and thread colors. At PODpartner, our experts handle this process to ensure your design stitches out perfectly.

Learn more about how embroidery digitization works at PODpartner.
How is embroidery pricing calculated?
Embroidery pricing depends on whether your design requires digitization or not. Below are the two scenarios:
1. When Digitization is Required
If you upload an image file (e.g., JPG or PNG), it needs to be digitized into a format suitable for embroidery. The digitization involves a one-time fee per embroidery frame in your product template.
About Digitization Fees:
- The digitization fee is solely determined by the number of embroidery frames (areas for placing embroidery) used in your design.
- Factors such as the stitch count, design size/complexity, and the number of thread colors will not impact the digitization fee.
Loyalty Program Benefits:
- The digitization fee per embroidery frame varies by membership tier, starting from USD 5.99. Unlock higher membership tiers and enjoy greater savings on digitization fees as your order volume grows. See the table below for details:

Once your design is digitized, the file will be saved in the product template and your file library. Future orders using the same digitized file will not incur additional digitization fees.
2. When Digitization is NOT Required
If you already have a
.DSTembroidery file or want to use custom text embroidery, no digitization fee is needed. The embroidery pricing will be calculated directly based on the number of embroidery frames, frame dimensions, and stitch counts.Embroidery Pricing Table:
For both digitized designs and
.DSTfiles (including custom text embroidery), the starting prices are as follows: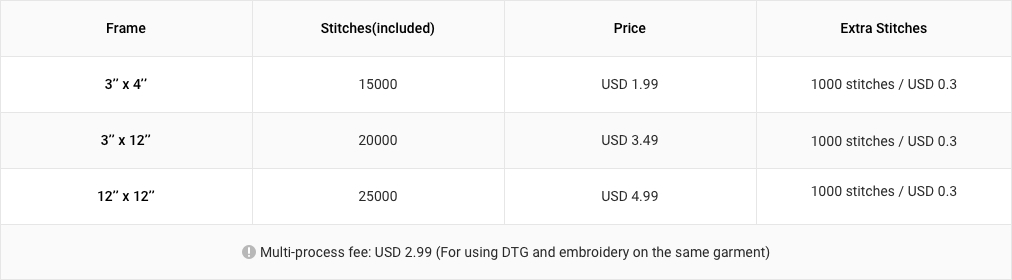
Important Note: After digitization is completed, the estimated stitch count will be updated to reflect the actual stitch count. The pricing for subsequent orders of this product template will be based on this updated stitch count.

 USD
USD