How do I design a product?
We’ll walk you through the entire design process with our free Design Creator.
1. Select a product from our catalog and click to enter the product details;
2. Click the "Start designing" button to design your product;
3. You’ll see five general design sections above the canvas: Front, Back, Left sleeve, Right sleeve, and Neck label. Click on a section you want to start with, and several thumbnail images representing different print areas will appear underneath (no thumbnail images for sleeves or neck label section);
4. Pick a print area, click the "Add Image" button to upload a print file, or click the "Add Text" button if you want to design a text graphic. Another way to upload an image is to simply click the plus button on the canvas.
5. While adjusting your design, you can view the real-time design outcome in the mockup generator on the left. Under the mockup generator are a number of garment colors for you to experiment with;
6. Repeat step 4 & 5 until you’re happy with your final design. Please note that each design area is printed discretely. So, to ensure a satisfactory print result, we do not recommend a fragmentary image pieced together from different prints.
7. Click the "Save" button to save the product template. You can always order a sample to see how your design looks in real life.
What are the print file requirements?
Your print file should meet the following:
- File size: no more than 50 MB per image.
- Format: PNG or JPG. If your design has transparent areas, use PNG.
- Resolution: at least 75 DPI, 150 DPI or higher recommended. For the best print quality, start at 300 DPI.
- Color profile: sRGB IEC61966-2.1, with the profile embedded when you export. Don't convert your file to CMYK before uploading, our system handles that conversion for print. Avoid Adobe RGB and ProPhoto RGB, since files in those color spaces get read against the wrong reference and colors shift. For more on how color conversion works, see [Which color profile should I use for my files?]
A note on resolution
Low DPI shows up as pixelation in the print. 150 DPI covers most designs. If yours has fine detail, going higher helps. Raising the DPI setting on an existing low-resolution file doesn't add detail, so build the file at your target resolution from the start.
Print size
Maximum print size depends on the product, the placement, and the garment size, so there's no single number that applies across the catalog.
To find it for what you're making: open the product page, go to the DTG guide tab, and check the table there. It lists every placement with its maximum print size and price. Jumbo DTG placements are on a separate tab within the same guide. The table is based on a reference garment size, and the Scaling guide linked at the top explains how print size adjusts across sizes.
Product pages also carry an HTV guide and an Embroidery guide. Requirements differ by decoration method, so check the tab that matches what you're ordering.
If there's a problem with your file
We check print files before production. If yours won't work or is likely to print poorly, we'll contact you first and you can adjust it.
If we don't hear back within 48 hours, we'll proceed with production using the file as submitted.
Which color profile should I use for my files?
Which color profile should I use for my files?
Use sRGB (sRGB IEC61966-2.1). Don't convert your file to CMYK before uploading. We handle the conversion for print on our end.
Understand the difference between RGB and CMYK
RGB stands for Red, Green, and Blue. It's how color works on screens: computers, phones, digital cameras.
CMYK stands for Cyan, Magenta, Yellow, and Black. It's the ink in the printer.
Both are true at the same time. Your file is RGB. Our ink is CMYK. The conversion between them happens in our system, not in yours.
Why sRGB, and why not just any RGB
RGB is a family, and the members cover different color ranges. sRGB, Adobe RGB, and ProPhoto RGB are all RGB.
Our printing system reads sRGB. Export in sRGB IEC61966-2.1 and keep the profile embedded in the file. Files saved in Adobe RGB or ProPhoto RGB get read against the wrong reference, and colors shift.
Why you shouldn't convert to CMYK yourself
When you convert to CMYK in Photoshop, you're converting into a printing-press CMYK profile. That profile was built for ink on paper, and its color range doesn't match our printer's inks.
Bright colors get cut at that moment. The file you upload is already dulled, and our system then converts it a second time. Whatever was lost in the first conversion can't come back.
Send us sRGB and we convert once, straight to what our printer can actually print.
What to expect with very bright colors
Some colors sit outside what any DTG ink can reproduce. Neons, electric blues, electric greens. These will print softer or shift slightly. Converting to CMYK first won't fix this, because the limit is the ink, not the file.
If you want to preview before uploading
Turn on soft proofing in your design app to see roughly how colors will shift. In Photoshop: View > Proof Setup > Working CMYK.
Look, then undo. Keep your file in sRGB and export it that way. Don't save the CMYK conversion. If one specific color looks wrong, adjust that color inside your sRGB file.
For resolution, file format, and size limits, see What are the print file requirements?
How do I manage my print files?
You can view and manage all your print files in File Library.
Upload files
You can click the “Upload" button to upload a single file or batch files. Once uploaded, these files will appear in the "My Files” section.
Manage files
If you mouse over an uploaded file, you will see a checkbox appears in the top left corner of the image. Choose a file by ticking the box, then you can move it to another folder, download it to your computer, or delete it. You can also rename the file by clicking on the original name under the image.
Create a new folder
On the “File Library” page, click the "New Folder" button to create a new folder. The new folder can be found in the "My Folder" section.
Manage folders
When you hover your cursor over a folder, two small icons will pop up in the top right corner, meaning you can either rename the folder or delete it.
Upload files to a particular folder
Open a folder, click on “Upload", and add files to this folder.
What is Custom Layer?
A custom layer is a customized design element that your customers can add to a garment. You can turn any image or text layer into a custom layer that your customers can personalize right in your store (such as adding names to neck tags or including a personal slogan alongside your brand design). All custom elements automatically flow through to PODpartner with each order. You just handle payment and we take care of the rest.
Note: This feature is currently available for Shopify stores only. We're working on expanding to other platforms.
Key points:
- Each product can have up to 3 custom layers.
- Custom layers apply only to DTG (direct-to-garment) printing, not embroidery. But custom layers can coexist with embroidery designs.
- Custom layers are optional; customers can choose to keep the default design or add their own.
- Once set by you in our Design Creator, customers cannot change font styles, font colors, sizes, or positions of the custom layers.
If a product template contains a custom layer, its thumbnail preview will be distinguishable from regular product templates by showing a customization symbol on the top right.
 If a product template containing custom layers is converted to an order, its order status on the Order page will be “Customization”.
You can set up automatic payments for customizable products to process orders more efficiently. To do this, go to PODpartner Dashboard > Settings >Store settings, find the Payment settings section for your Shopify store, then turn on automatic payments and toggle the Customizable product option.
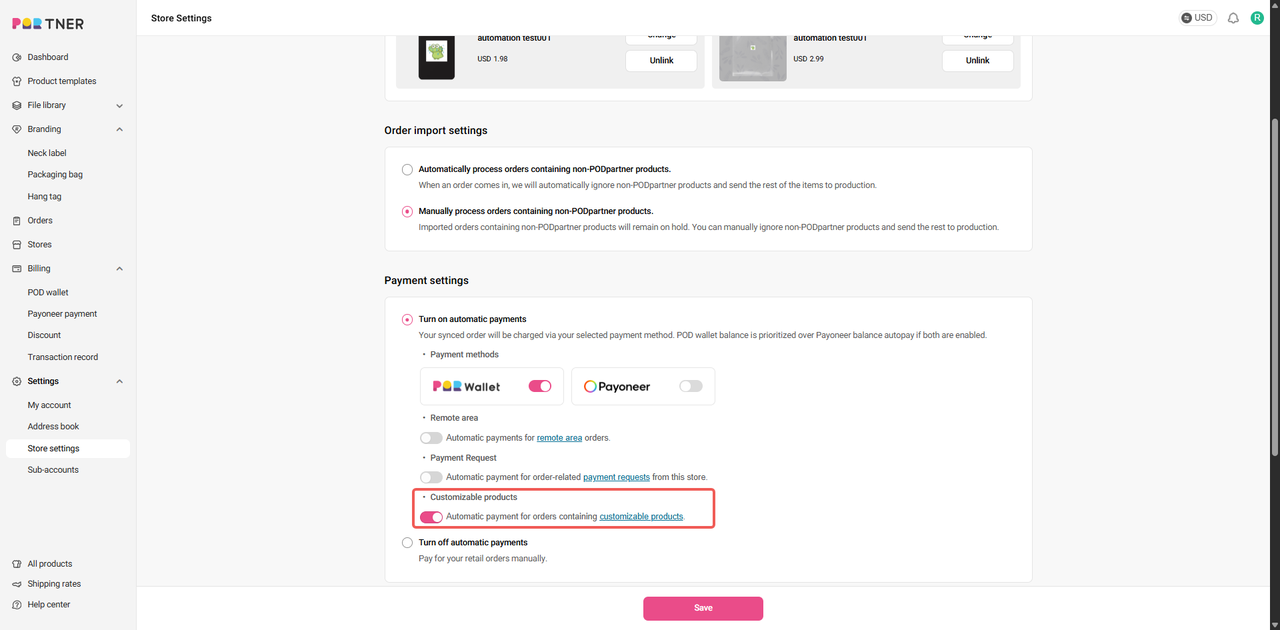
If you need to edit a custom layer, you should do it before paying for the order. In case of any issues occurring after the payment, please reach out to our customer service.
To learn how to create a custom layer, please check out our detailed tutorial.
Do I need to follow any content rules?
We encourage creativity and personality on the premise of originality and respect for the law. Please keep in mind that you are solely responsible for the content in the print and embroidery files you upload. Any print and embroidery pertaining to the following content violations may be reviewed or removed permanently.
1. Intellectual property infringement
Intellectual property infringement mainly consists of trademark/patent/copyright infringement and violation of publicity rights. The content you submit to PODpartner must be original and comply with intellectual property law.
2. Illegal content
Content containing images or depictions of child abuse, child pornography, or any form of obscenity is not tolerated; content that promotes crime, violence, terrorism, or other harmful activities is also prohibited.
3. Hateful content
We do not allow any content expressing hatred towards or threatening other people based on their race, age, gender, gender identity, ethnicity, national origin, sexual orientation, religion, disability, or serious disease.
4. Infringement of privacy
You may not submit any content that contains another person’s sensitive personal information, including but not limited to their name, picture, confidential scripts, or depiction of their private affairs unless you have their consent.
How will my design look in different garment sizes?
Your design will look the same no matter the garment size, because the actual print size always remains proportional to the garment size.
Can I edit a design I previously created?
Yes. You can go to Dashboard, click on "Product Templates", find the template you want to modify, click the "Edit" button to access the Design Creator, and start editing the template.
Please note that if the template has already been applied in an unpaid order, you cannot directly edit it. However, you can duplicate it and edit the copy.
How many print areas does Design Creator support?
Our Design Creator supports a maximum of 18 print areas on a garment. You can add up to 7 designs on the front/back side.
How do I add text to a product?
To start, you must first choose a product, open our Design Creator, and select a print area where you want to add text. There are two ways to add text to a product.
One way is to click the "Add Text" button above the Design Creator palette and enter your text directly in the textbox. You can freely adjust the text size and style in the tool palette.
Another way is to use design software(Photoshop, Illustrator, etc.) to design your text and save the file in PNG or JPG format. Then press "Add image" in PODpartner's Design Creator, upload the file you just saved, and adjust the image size and position the way you want.

- How it works
- Shipping
- About us
- Blog
- CapabilitiesEmbroideryPersonalizationJumbo DTG
- Help center
 USD
USD